
Validation asp.net Configuration at Startup

· One min read
Mark Burton
Software Engineer & Technical Writer

Using the [Options pattern in ASP.NET Core] allows you to benefit from [Options validation], but this only fires the first time the configuration is accessed. The Options Pattern is build on top of Configure and OptionsBuilder.Bind(IConfiguration config) will actually call Configure(IConfiguration config) directly, so they are also equivalent. Both methods do the same job but AddOptions came later and allows more customizations. It would be much better to prevent a service starting if there are configuration values missing or with invalid values. Such functionality is not provided by the framework as of .net5.0, the GitHub issue [Options Validation: support eager validation] remains open. The following method of Options Validation is taken from [Baget] with small modifications to allow sharing the implementation with multiple services. You can get the full working demo from my GitHub repo. [Options pattern in ASP.NET Core]: https:/docs.microsoft.comen-usaspnetcorefundamentalsconfigurationoptions?view=aspnetcore-3.1#options-validation [Options validation]: https:/docs.microsoft.comen-usaspnetcorefundamentalsconfigurationoptions?view=aspnetcore-3.1#options-validation [Options Validation: support eager validation]: https:/github.comdotnetruntimeissues36391 [Baget]: https:/github.comloic-sharmaBaGet [ConfigureOptions doesn't register validations as expected]: https:/github.comdotnetruntimeissues38491

Signing Documents With a LuxTrust Signing Stick

· 3 min read
Mark Burton
Software Engineer & Technical Writer

Installation

Installation is easy enough, download the correct installer from the LuxTrust Middleware Download page and install. You will see the LuxTrust Middleware running in your system tray. System Tray After LuxTrust Middleware Install 
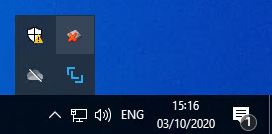
You will notice 2 icons have been added to the systray. The LuxTrust Middleware has the distinctive logo LuxTrust Middleware System Tray Icon there are not many options when you click on the Middleware icon, configure allows you to change the log level and About has a Support tab which provides easy access to the log file (can be found at %UserProfile%\.luxtrust\logs), which does become useful quite soon. But what is this LuxTrust Middleware System Tray Icon second icon? Right click on the icon and choose about, you are greeted with this Gemalto Classic Client about box. Gemalto Classic Client About Box 
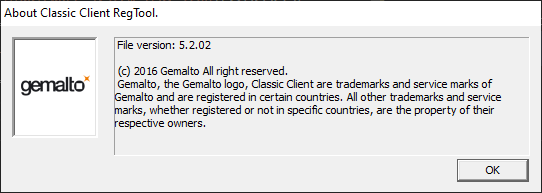
But who are Gemalto and why is their toolbox installed on my system? It is not mentioned anywhere in the LuxTrust Middleware Installation Guide (warning links to a pdf), but if you had been watching the installer closely you will see it installed Classic Client Toolbox, ## Activation ## Signing PDF ## Signing XML Finding the right software to sign an XML file is not easy, the following is a list of software I tried with mixed results; * Szafir - Doesn't seem to recognise the LuxTrust Signing Stick or certificates. Does have a very nice validator.

Blue Angels at RAF Hucknall Airshow

· One min read
Mark Burton
Software Engineer & Technical Writer

References

https:/forums.airshows.co.ukviewtopic.php?t=65529 https:/www.britmodeller.comforumsindex.php?topic41001-hucknall-airday-2009/ https:/nottstalgia.comforumstopic8455-hucknall-airfield?page=3 https:/www.key.aeroforumhistoric-aviation35764-worst-airshow?page=3 https:/www.fightercontrol.co.ukforumviewtopic.php?t=154903 http:/huflighttestmuseum.co.ukvisit.html

Migrating my blog from Wyam to Statiq

· 3 min read
Mark Burton
Software Engineer & Technical Writer

The initial steps to setup a new blog with Statiq or migrate from Wyam are covered in porting from Wyam document in the CleanBlog repo. There are additional points raised in the GitHub discussions on the StatiqDev Discussions repo most specifically in the Migration from Wyam discussion. I had customized my blog slightly while using Wyam so there was some additional work to do. ## Bringing back the triangles Several javascript libraries have been removed from the CleanBlog theme, some of which were used to generate dynamic triangles for the header background when an image is not used. I started the discussion Javascript changes between Wyam and Statiq CleanBlog (or where have my triangles gone? 😊 ) and reintroduced the necessary libraries to bring back the triangles. ## Font Awesome Updates The move from FontAwesome 4 to 5 means that many icons stopped working, this is due to brand icons moving to a new prefix, so I had to change fa to fab in a number of places, where fa still works it appears better to change those to fas based on FontAwesome's own upgrading from version 4 guide ## Fix styles on custom navbar entries I added a dropdown to my navbar, which has lost its style after the upgrade, this appears to be a bootstrap 3 to upgrade issue. ## Publishing to Netlify Install the Netlify CLI npm install netlify-cli -g ## Exclude NetlifyCMS directory from processing and copy it to output I have been managing my Wyam blog with NetlifyCMS, this is simply a directory called admin with 2 files, index.html and config.yml. Wyam copied those files unchanged to the output. With Statiq that has changed and it processes the html file which makes it invalid, skips the config.yml file and adds a link to admin to the NavBar. Adding a file called _directory.yml to the admin directory makes it possible to set directory wide meta data, ShowInNavBar: False removes the admin link from the NavBar, setting the ContentType and MediaType, as discussed on the StatiqDev GitHub discussion Migration from Wyam, resulted in the desired behaviour yaml ShowInNavBar: False ContentType: Asset MediaType: textplain ## Update _post-footer.cshtml to set the Disqus configuration variables ``` csharp /* * * CONFIGURATION VARIABLES: EDIT BEFORE PASTING INTO YOUR WEBPAGE * * */ var disqus_identifier = '@Document.Destination.FileNameWithoutExtension.FullPath'; var disqus_title = '@Document.GetString("Title")'; var disqus_url = '@Document.GetLink(true)';

Local Hostname Resolution To Port

· 3 min read
Mark Burton
Software Engineer & Technical Writer

It is not possible to make this work on 127.0.0.1, however the entire block 1278 is reserved for local loopback so any other 127.n.n.n address will work, more interesting reading about that on stackoverflow and in RFC 1700 :::

Hosts file Add a new entry for each service to the hosts file in C:\Windows\System32\drivers\etc\. ``` cmd 127.0.0.2 mailhog.internal 127.0.0.3 git.internal

``` ### Unbound Install Unbound. Add entries to service.conf by default on Windows that is in C:\Program Files\Unbound ### .local vs .localhost vs .test vs .internal

info

After reading round in circles about reserved TLDs such as rfc2606 which lists .test, .example, .invalid, .localhost as reserved domain names. This stackoverflow on best practices for internal domain and network names This TechNet article which goes back on previous advice about the use of .local and .internal.The risks of using my initial choice of .local due to possible clashes with mDNS and Zero Configuration Networking. Trying to use servicename.localhost with mixed results (works with hosts file but causes Unbound to throw and error and fail to start) and noticing that docker uses .internal I finally found RFC6762#appendix-G which lists .intranet., .internal., .private., .corp., .home. and .lan. as proposed reserved domain names, I settled on using .internal.

server:  local-data: "mailhog.internal A 127.0.0.2"  local-data-ptr: "127.0.0.2 mailhog.internal"  local-data: "git.internal A 127.0.0.3"  local-data-ptr: "127.0.0.3 git.internal"  ```  Restart the service to make sure the new settings are used.  Add `127.0.0.1` at the top of the list of DNS servers in network settings.  ![Network settings with 127.0.0.1 as DNS server](/img/local_dns_with_unbound_network_settings.png)  ## Add a netsh interface portproxy  ```
netsh interface portproxy add v4tov4 listenport=80 listenaddress=127.0.0.2 connectport=8025 connectaddress=127.0.0.2 netsh interface portproxy add v4tov4 listenport=80 listenaddress=127.0.0.3 connectport=3005 connectaddress=127.0.0.3

or by domain name

netsh interface portproxy add v4tov4 listenport=80 listenaddress=mailhog connectport=8025 connectaddress=127.0.0.2  netsh interface portproxy add v4tov4 listenport=80 listenaddress=git.local connectport=3005 connectaddress=127.0.0.3
``` :::info
Between the 16 million loopback addresses and 65 thousand (48k usable according to [TCPIP number usage] and the Microsoft article [Port Exhaustion and You]) ports that leaves us a whole lot of services we can address on a single machine.
:::
I still need to figure out how this will work with IPv6 at the moment I only use IPv4 locally. I also need to understand the exact equivalence of `127.0.0.08` and `::1128`. netsh interface portproxy add v6tov4 listenport=80 listenaddress \\{IPv6Address | HostName\} \[connectaddress=] \\{IPv4Address | HostName\} \[[connectport=] \\{Integer | ServiceName\}] \[[listenaddress=] \\{IPv6Address | HostName\} \[[protocol=]tcp] Full [Network Shell (netsh) documentation](https:/docs.microsoft.comen-uswindows-servernetworkingtechnologiesnetshnetsh-interface-portproxy) on Microsoft docs. ## References
[Using port number in Windows host file]: https:/stackoverflow.coma/366467497400768
[TCPIP number usage]: https:/stackoverflow.comquestions113224what-is-the-largest-tcp-ip-network-port-number-allowable-for-ipv4
[Port Exhaustion and You]: https:/docs.microsoft.comen-usarchiveblogsaskdsport-exhaustion-and-you-or-why-the-netstat-tool-is-your-friend

· 2 min read
Mark Burton
Software Engineer & Technical Writer

A Route is the inbound URL which the reverse proxy is going to act on. The cluster is a list of potential destination URLs.

"ReverseProxy": {
"Routes": [
{
"RouteId": "LoginServiceRoute",
"ClusterId": "clusterLoginService",
"Match": {
"Path": "/loginservice/{**remainder}"
},
"Transforms": [
{
"PathRemovePrefix": "/loginservice"
}
]
}
],
"Clusters": {
"clusterLoginService": {
"Destinations": {
"clusterLoginService/destination1": {
"Address": "https://localhost:1116/"
}
}
}
}
}
``` This would be similar to this NGINX virtual server configuration.

```nginx
server {
listen 80;
server_name localhost;
location /loginservice/ {
proxy_pass https://localhost:1116/;
}
}
``` Take care when adding a transformation to a route, **do not** add a single transformation, it must be wrapped in [] or you will get no transformations and lots of confusion.

My mistake looked like this

```json
{
"RouteId": "TestServiceRoute",
"ClusterId": "clusterTestService",
"Match": {
"Path": "/testservice/{**remainder}"
},
"Transforms": {
"PathRemovePrefix": "/testservice"
}
},
``` It took debugging into the YARP source to figure out my mistake which resulted in 503 and 404 errors due to URLs like `https://localhost:1116/loginservice/hc` instead of the correct `https://localhost:1116/hc`.

```json
{
"RouteId": "TestServiceRoute",
"ClusterId": "clusterTestService",
"Match": {
"Path": "/testservice/{**remainder}"
},
"Transforms": [ // <-- was missing
{
"PathRemovePrefix": "/testservice"
}
] // <-- was missing
},
``` It is easier to see the issue as soon as you start adding additional transformations. In preview 5 for example it is possible to transform route values to querystring parameters, now it is clear that `Transformations` must be an array.

```json
{
"RouteId": "TestPatternServiceRoute",
"ClusterId": "clusterTestService",
"Match": {
"Path": "/testpatternservice/{**remainder}"
},
"Transforms": [
{
"PathPattern": "/search"
},
{
"QueryRouteParameter": "q",
"Append": "remainder"
}
]
},

How to Setup ASP.NET Core Health Check UI

· 2 min read
Mark Burton
Software Engineer & Technical Writer

In Part one we setup the health check endpoints, now to add a frontend.

The Health Checks UI is best hosted in its own service as it can consolidate health checks for a number of services.

Swagger CORS error

Adding the HealthChecks UI to the service involves adding 2 nuget packages, the main AspNetCore.HealthChecks.UI package and a storage provider, initially I have used the InMemory storage provider as I do not have the need to see historical data. There are also providers various databases including SqlServer and SQLite which can be used to persist the data.

<PackageReference Include="AspNetCore.HealthChecks.UI" Version="$(AspNetCoreHealthChecksUIVersion)" />
<PackageReference Include="AspNetCore.HealthChecks.UI.InMemory.Storage" Version="$(AspNetCoreHealthChecksUIVersion)" />

As the HealthChecks nuget packages will be used across all projects I have set the version numbers centrally in Directory.Build.props.

<AspNetCoreHealthChecksUIVersion>3.1.1</AspNetCoreHealthChecksUIVersion>

The HealthChecks UI can now be added to ConfigureServices and Configure in Startup.cs.

As I want to limit the access to the UI in the same way as I did for the HealthCheck endpoints I have the service listening on multiple ports and use RequireHost when configuring the endpoints to ensure the UI is only accessible internally.

public void ConfigureServices(IServiceCollection services)
{
services
.AddHealthChecksUI()
.AddInMemoryStorage();
services.AddControllers();
}

public void Configure(IApplicationBuilder app, IWebHostEnvironment env)
{
app.UseHealthChecksUI();
app.UseEndpoints(endpoints => {
endpoints.MapControllers();
endpoints.MapHealthChecksUI(config => {
config.UIPath = "/hc-ui";
}).RequireHost($"*:{Configuration["ManagementPort"]}");
});
}
``` Finally we need to tell the UI where to read the HealthChecks from, this can either be done in a configuration file ```json
...
"https_port": 1131,
"Urls": "http://localhost:1130;https://localhost:1131;https://localhost:1132",
"ManagementPort": "1132",
"AllowedHosts": "*",
"HealthChecks-UI": {
"HealthChecks": [
{
"Name": "LoginService Check",
"Uri": "https://localhost:1116/hc"
},
{
"Name": "ResourceService Check",
"Uri": "https://localhost:5002/hc"
},
{
"Name": "NotificationService Check",
"Uri": "https://localhost:1179/hc"
}
]
}
...
``` or in code by adding settings to the `AddHealthChecksUI` method. ```csharp
services.AddHealthChecksUI(setupSettings: settings => {
settings
.DisableDatabaseMigrations()
.AddHealthCheckEndpoint(name: healthCheckName, uri: healthCheckUri)
.AddWebhookNotification(name: webhookName, uri: webhookUri, payload: webhookPayload,
restorePayload: webhookRestorePayload)
.SetEvaluationTimeInSeconds(evaluationTimeInSeconds)
.SetMinimumSecondsBetweenFailureNotifications(minimumSeconds);
}).AddInMemoryStorage();
``` You can get the full working demo from [my GitHub repo](https:/github.comMarkZitherSwaggerAndHealthCheckBlog).

Secure ASP.NET Core Health Checks to a specific port

· 2 min read
Mark Burton
Software Engineer & Technical Writer

To secure Health Checks it is possible to make them available on internal addresses only and on a different port to the publicly served pagesAPI endpoints. First we need to make the service available over 2 different ports, this can be achieved by adding a Urls value to the appsettings.config. json "Logging": \\\{ "IncludeScopes": false, "LogLevel": \{ "Default": "Debug", "System": "Information", "Microsoft": "Information" \\} }, "Urls": "http:/localhost:1114;http:/localhost:1115", "ManagementPort": "1115", "ConnectionStrings": \\{ "LoginServiceDb": "Data Source=.,11433;Initial Catalog=LoginServiceDatabase;Integrated Security=true;" \}, This can be done in several ways, and is described in more detail by Andrew Lock in his post 5 ways to set the URLs for an ASP.NET Core app. Now when you debug the service you should see in the log that it is listening on 2 ports ``` info: Microsoft.Hosting.Lifetime[0] Now listening on: http:/localhost:1114 info: Microsoft.Hosting.Lifetime[0] Now listening on: http:/localhost:1115 info: Microsoft.Hosting.Lifetime[0] Application started. Press Ctrl+C to shut down.

**Special note if you are using http.sys** If you want to run this over https you will need to take care of the port reservation and certification binding. I have a explanation of that in the GitHub Repo README.
::: Now that we have the service listening on 2 addresses we can specify one of them will serve up the Health Checks by setting the `ManagementPort`. In `startup.cs` we can use the `ManagementPort` to secure the Health Check endpoint ```csharp HealthCheck middleware app.UseHealthChecks("hc", $"\\{Configuration["ManagementPort"]\}", new HealthCheckOptions() \\{ Predicate = _ => true, ResponseWriter = UIResponseWriter.WriteHealthCheckUIResponse \}); app.UseEndpoints(endpoints => \\\{ endpoints.MapControllerRoute("default", "\{controller=Home\\}\{action=Index\}\\{id?\}"); endpoints.MapHealthChecks("health").RequireHost($"*:\\{Configuration["ManagementPort"]\}"); });
``` If you debug now you will have access to the `health` endpoint only on the `ManagementPort` and not on the public facing URL. ![HealthCheck external shows 404 while internal shows overall health status](/img/health_endpoint.png) More interestingly you can also go to the `hc` endpoint, this contains more detailed information about the state of the service and therefore needs to be secured. ![HealthCheck external shows 404 while internal shows detailed health status](/img/hc_endpoint.png) Now you can safely get the status of your services reported as json, but there are 2 further aspects of ASP.NET Core Health Checks, the UI and push-based monitoring, i will cover those in parts 2 and 3.

Secure Swagger on ASP.NET Core by address and port

· 3 min read
Mark Burton
Software Engineer & Technical Writer

This follows on from my previous post Secure ASP.NET Core Health Checks to a specific port and assumes that you already have your service running over 2 ports and have specified a ManagementPort in the appsettings.json file.

Special note if you are using http.sys If you want to run this over https you will need to take care of the port reservation and certification binding. I have a explanation of that in the GitHub Repo README.

Swagger is a powerful tool to test your APIs and allow users to easily discover how to consume your APIs, but it can also open up security issues and make it easier for attackers to access your data.

Best practice is to secure access to your Swagger pages using OAuth as described by Scott Brady but in some scenarios it would be better if the Swagger pages are not be accessible externally at all.

As discussed in this GitHub issue, it is not possible out of the box to limit access to a specific URL.

By changing the SwaggerEndpoint to specify absolute URL it is possible to prevent access to the documentation on the public facing URL.

app.UseSwaggerUI(c => {
c.SwaggerEndpoint("http://localhost:1115/swagger/v1/swagger.json", "Login Service API V1");
c.RoutePrefix = string.Empty;
});

However this still leaves the Swagger homepage accessible displaying an error message due to CORS issues.

Swagger CORS error

To reject all requests to Swagger that are not on an internal address we need to create a middleware, something like this suggestion by Thwaitesy

public class SwaggerUrlPortAuthMiddleware {
private readonly RequestDelegate next;

public SwaggerUrlPortAuthMiddleware(RequestDelegate next) {
this.next = next;
}

public async Task InvokeAsync(HttpContext context, IConfiguration configuration) {
// Make sure we are hitting the swagger path, and not doing it locally and are on the management port
if (context.Request.Path.StartsWithSegments("/swagger") && !configuration.GetValue<int>("ManagementPort").Equals(context.Request.Host.Port)) {
// Return unauthorized
context.Response.StatusCode = (int)HttpStatusCode.Unauthorized;
}
else {
await next.Invoke(context);
}
}

public bool IsLocalRequest(HttpContext context) {
// Handle running using the Microsoft.AspNetCore.TestHost and the site being run entirely locally in memory without an actual TCP/IP connection
if (context.Connection.RemoteIpAddress == null && context.Connection.LocalIpAddress == null) {
return true;
}
if (context.Connection.RemoteIpAddress.Equals(context.Connection.LocalIpAddress)) {
return true;
}
if (IPAddress.IsLoopback(context.Connection.RemoteIpAddress)) {
return true;
}
return false;
}
}

Assuming your project layout is something like BaGet.

The middleware should be added to your shared project in the Extensions directory.

Add the following extension method to IApplicationBuilderExtensions to add the middleware and keep your startup clean.

public static class SwaggerAuthorizeExtensions {
public static IApplicationBuilder UseSwaggerAuthorized(this IApplicationBuilder builder) {
return builder.UseMiddleware<SwaggerUrlPortAuthMiddleware>();
}
}

This middleware must be registered before swagger, so in startup.cs change Configure to add the middleware by calling the new extension method.

public void Configure(IApplicationBuilder app, IWebHostEnvironment env) {
...
app.UseSwaggerAuthorized();
app.UseSwagger();
app.UseSwaggerUI(c => {
c.SwaggerEndpoint("/v1/swagger.json", "Login Service API V1");
});
...
}

Now running the service will return a 401 on the public facing URL and serve swagger internally.

Public facing swagger returns 401 internal works

It is still recommended to secure swagger with OAuth as a misconfiguration could still lead to your Swagger being exposed this way, for example behind a reverse proxy.